
Search
Search
Latest topics
Latest topics
 Wed Dec 08, 2010 10:15 pm by
 Affiliates

Affiliates
Elbow joint
Page 1 of 1

Elbow joint
![]() TopCat_3D™ Fri Nov 26, 2010 1:56 am
TopCat_3D™ Fri Nov 26, 2010 1:56 am
winkel stück zum verbinden zmodeler is kein ersatzteillager^^
du musst das alles, was du bist jetzt gemacht hast, inklusive dem fehlenden winkelstück,
aus einem guss machen....ist das beste....
also ein zylinder mit vielen polys....nicht im umfang....aber in der länge....
dieses musst du dann biegen.....
so wie auf deiner zeichnung....in der top ansicht.....
also machst du dir erst mal ein neuen zylinder....mit vielen polyreihen hintereinander
sieht dann so aus :

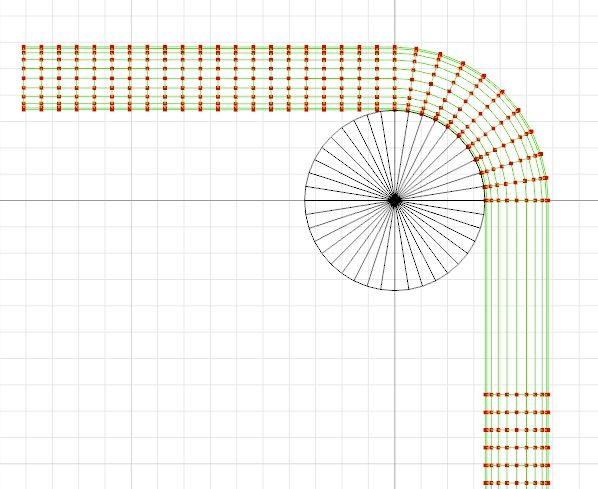
dann machst du dir einen 2. cylinder...einem sogenannten "helfer"....
damit das rohr auch schön gleichmäßig gebogen wird....sieht so aus:

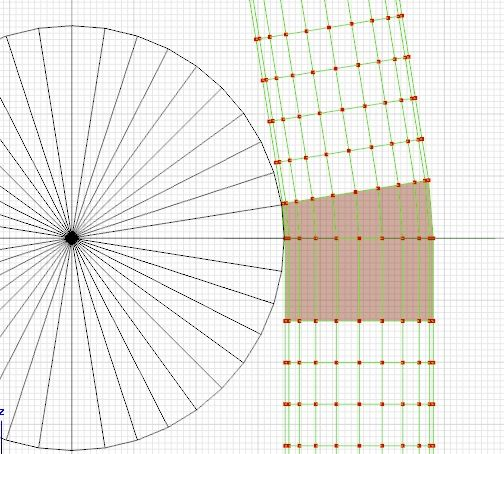
du hast oben 4 würfel, mit verschiedenen punkten drauf...
der linke würfel is der "vertex"...( der name wird dir auch angezeigt, wenn du nur mit dem courser draufgehst)...
da klickst du drauf, und dann sofort auf dein rohr vom bullfänger....
es werden dann alles punkte dargestellt....sieht dann so aus :

dann gehst du auf select / quadr und ziehst ein quadrat um die polys.....
von oben angefangen bis zu mitte...so das sich die reihe auf der null linie im modeller noch mit einfärbt....
sieht etwa so aus:

wobei das gezogene quadrat auf dem bild eine polyreihe zu tief is....sorry^^
dann schaltest du quadr und select wieder aus....klickst auf modify / rotate...und schaltest oben X und Y an....
dann drehst du den makierten teil ein wenig, bis er mit den linien den "helfers" in etwa übereinstimmt...
sieht so in etwa aus:

schaltest alles wieder aus....gehst auf select / none und machst ein rechtsklick ins top-fenster....
dann geht die makierung (rot)wieder weg...
dann gehst du wieder auf select / quadr und makierst NUR die polyreihe unter der nulllinie....

also quasi die nächste reihe....gehst auf modify / move...und schaltest oben nur das Y ein....nicht x !!
und schiebst die polyreihe nach oben auf der nulllinie....sieht dann so aus:
machst modify / move wieder aus...gehst auf select / quadr und makierst den restlichen oberen teil...
machst wieder alles zu...gehst wieder auf modify / rotate...und schaltest oben wieder X und Y an,
und drehst den ganzen oberen teil wieder ein bisschen....so dass es wieder mit den linien vom "helfer" übereinstimmt....
sieht so aus:

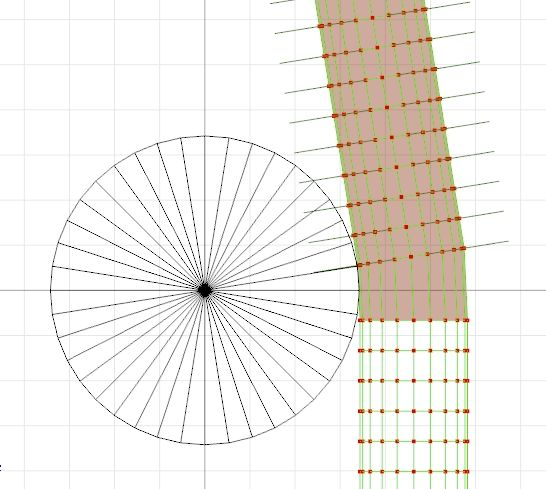
diese ganzen schritte wiederholst du solange,bis die biegung 90 grad erreicht hat,
und die polyreihe mit denen des "helfers" übereinstimmen....sieht dann so aus:
achte darauf, oben immer X und Y richtig ein/auszuschalten...
schön konzentrieren an der drehbank
wenn du alles richtig gemacht hast,
sollte es in der 3d ansicht in etwa so aussehn
:du musst das alles, was du bist jetzt gemacht hast, inklusive dem fehlenden winkelstück,
aus einem guss machen....ist das beste....
also ein zylinder mit vielen polys....nicht im umfang....aber in der länge....
dieses musst du dann biegen.....
so wie auf deiner zeichnung....in der top ansicht.....
also machst du dir erst mal ein neuen zylinder....mit vielen polyreihen hintereinander
sieht dann so aus :
dann machst du dir einen 2. cylinder...einem sogenannten "helfer"....
damit das rohr auch schön gleichmäßig gebogen wird....sieht so aus:
du hast oben 4 würfel, mit verschiedenen punkten drauf...
der linke würfel is der "vertex"...( der name wird dir auch angezeigt, wenn du nur mit dem courser draufgehst)...
da klickst du drauf, und dann sofort auf dein rohr vom bullfänger....
es werden dann alles punkte dargestellt....sieht dann so aus :
dann gehst du auf select / quadr und ziehst ein quadrat um die polys.....
von oben angefangen bis zu mitte...so das sich die reihe auf der null linie im modeller noch mit einfärbt....
sieht etwa so aus:
wobei das gezogene quadrat auf dem bild eine polyreihe zu tief is....sorry^^
dann schaltest du quadr und select wieder aus....klickst auf modify / rotate...und schaltest oben X und Y an....
dann drehst du den makierten teil ein wenig, bis er mit den linien den "helfers" in etwa übereinstimmt...
sieht so in etwa aus:
schaltest alles wieder aus....gehst auf select / none und machst ein rechtsklick ins top-fenster....
dann geht die makierung (rot)wieder weg...
dann gehst du wieder auf select / quadr und makierst NUR die polyreihe unter der nulllinie....
also quasi die nächste reihe....gehst auf modify / move...und schaltest oben nur das Y ein....nicht x !!
und schiebst die polyreihe nach oben auf der nulllinie....sieht dann so aus:
machst modify / move wieder aus...gehst auf select / quadr und makierst den restlichen oberen teil...
machst wieder alles zu...gehst wieder auf modify / rotate...und schaltest oben wieder X und Y an,
und drehst den ganzen oberen teil wieder ein bisschen....so dass es wieder mit den linien vom "helfer" übereinstimmt....
sieht so aus:
diese ganzen schritte wiederholst du solange,bis die biegung 90 grad erreicht hat,
und die polyreihe mit denen des "helfers" übereinstimmen....sieht dann so aus:
achte darauf, oben immer X und Y richtig ein/auszuschalten...
schön konzentrieren an der drehbank
wenn du alles richtig gemacht hast,
sollte es in der 3d ansicht in etwa so aussehn

so, jetzt bist du dran....mir tun die finger weh vom schreiben
//edit
vergessen...sorry...du musst natürlich jedesmal, wenn du im "vertex" modus die polys verschiebts,
unten "selected mode" einschalten...dann werden die makierten polys als grüne linie verbunden....
und dann erst verschieben/drehen
English:
elbow to connect ZModeler is not a spare parts warehouse ^ ^
you have to include everything that you have not made, including the lack of elbow,
of a cast make .... is the best ....
Thus, a cylinder with many polys .... .... but not in the scope in the length ....
this you must then turn .....
just like on your signature .... view in the top .....
So you do you take a first new cylinder .... with many polyreihen succession
looks like this:
then you make yourself a second cylinder ... a so-called "helpers "....
so that the tube is also bent uniformly beautiful .... looks like this:
you have up 4 cubes, with different points on it ...
The left cube is the "vertex "...( the name you can also see if you just go with the courser on it) ...
as you click on it, and then immediately on your tube from the bull catcher ....
It will be shown all the points .... looks like this:
then you go to select / quadr and draw a square around the polys .....
starting from the top to the middle ... so the series on the zero line in the modeller with even coloring ....
looks like this:
with the drawn on the picture to deep square polyreihe is .... sorry ^ ^
then you switch quadr and select again .... click on modify / rotate ... and above X and Y switched to test ....
then you turn the makiert part a little, until it complies with the guidelines of the "help" in some ...
looks like something like this:
dish test everything again .... go to select / none and do a right click in the top window ....
Then comes the Makierung (red) to leave ...
then you go back to select / quadr and makierst ONLY polyreihe below the zero line ....
So virtually the next series .... go to modify / move ... and unlock only the top Y not .... x!
and push the polyreihe up on the zero line .... looks like this:
do modify / move out again ... go to select / quadr makierst and the rest of the upper part ...
re doing everything to go back ... to modify / rotate and unlock the top ... again X and Y,
and the whole upper part to back out a bit .... so it is again with the lines of "helper" match ....
looks like this:
all these steps you repeat until the deflection reaches 90 degrees,
and polyreihe with those of the "help" match .... looks like this:
Make sure the top you need X and Y properly on / off ...
nice focus on the lathe
if you did everything correctly,
should view it in 3d like this but appearance
so now you're tuned .... I feel the hurt finger to write by
/ / Edit
Sorry ... forgot ... you must of course every time you in the "vertex" mode shifts the polys,
Turn down "selected mode" ... then the makiert polys as a green line connected ....
and only then move/rotate
(Source) TruckSimsForum by Holli

TopCat_3D™- Admin

- Posts : 17
Join date : 2010-11-10
Age : 38
Location : German, English
Page 1 of 1
Permissions in this forum:
You cannot reply to topics in this forum|
|
|
» Mat Einstellung/Mat set
» Collisionsboxen von trailer
» Multy Mats On by Ventures87
» OGG files von Sounds
» Elbow joint
» Cargos new use of old savegame
» Euro Truck Simulator - Enterprise
» PMG right Fixen